spring-boot with r2dbc for PostgreSQL
· 3 min read

BackEnd Software Developer
이 문서는 Spring Boot에서 R2DBC와 PostgreSQL을 함께 사용할 때 유용한 설정과 팁을 정리한 것입니다.
이 문서는 Spring Boot에서 R2DBC와 PostgreSQL을 함께 사용할 때 유용한 설정과 팁을 정리한 것입니다.
mTLS는 mutual TLS의 약자로, 서버와 클라이언트가 서로를 인증하는 TLS 통신 방식입니다.
일반 HTTPS보다 더 높은 수준의 보안 통신이 요구되는 핀테크, 헬스케어, 마이크로서비스 환경에서 널리 사용됩니다.
트랜잭션 간의 동시성 처리 중 정합성 문제를 얼마나 허용할 것인지를 정하는 기준입니다.
이 가이드는 Markdown 파일에 정의된 테이블을 읽어,
각 행을 GitHub Issue로 자동 등록하는 방법을 설명합니다.
서비스 또는 프로젝트 초기 단계에서는 구체적인 화면, UI, 구현 방식보다는 **서비스의 핵심 가치와 주요 기능(Feature)**에 집중한 논의가 선행되어야 합니다.
그러나 많은 경우, 각 역할(stake-holder)들이 자신의 시야로만 해석된 요구사항에 초점을 맞추어 소통하는 바람에, 기능의 본질이나 사용자 가치가 희석되는 문제가 발생합니다.
이 문서는 하나의 기능(Feature)을 중심으로 모든 팀(기획, 디자인, 개발, QA)이 자신만의 관점으로 분석하고 의견을 제시할 수 있도록 정렬된 구조를 제공합니다.
이를 통해 조기에 가치 중심의 합의를 형성하고, 불필요한 구현 낭비를 줄이며, 실질적인 사용자 가치를 전달할 수 있는 기반을 마련하는 데 목적이 있습니다.
Redis Cluster 환경에서의 Topology 변화, 클라이언트 동작 방식, 그리고 Read 전략에 대한 핵심 내용을 정리합니다. 실무 및 면접에서 바로 활용 가능한 내용으로 구성하였습니다.
Apple Silicon(M1, M2, M3 등)을 사용하는 macOS 환경에서는 PyTorch의 cuda 대신 Metal Performance Shaders(MPS) 백엔드를 사용해야 합니다. 하지만 이때 주의해야 할 점 중 하나가 바로 torch_dtype 설정입니다.
JVM은 실행 중 다음과 같은 주요 메모리 영역을 사용합니다:
new 객체가 이곳에 생성됨[2.303s][info][gc,metaspace] GC(12) Metaspace: 60293K(60736K)->60293K(60736K)
NonClass: 52643K(52864K)->52643K(52864K)
Class: 7650K(7872K)->7650K(7872K)
-XX:MaxMetaspaceSize로 제한 가능-XX:MetaspaceSize=64m
-XX:MaxMetaspaceSize=256m
| 전략 | 설명 |
|---|---|
| 참조 해제 | obj = null 등으로 명시적 해제 |
| 스코프 축소 | 메서드 지역 변수, 블록 사용 |
| Escape Analysis 유도 | 외부로 노출되지 않으면 Stack 할당 |
| WeakReference 사용 | 캐시 등에서 유용하게 사용 |
| ThreadLocal 관리 | 사용 후 반드시 .remove() 호출 |
ThreadLocal은 Thread가 종료되기 전까지 참조 유지 → ThreadPool에서 주의 필요try {
threadLocal.set(value);
...
} finally {
threadLocal.remove();
}
jcmd <pid> VM.native_memory summaryjcmd <pid> GC.class_stats-XX:+PrintGCDetails -Xlog:gc* → GC 로그 확인💡 JVM의 메모리 구조와 GC 동작을 이해하면, 예기치 못한 메모리 이슈를 사전에 방지하고,
성능 최적화와 운영 안정성을 높일 수 있습니다.
현대 분산 시스템에서 외부 API 호출이나 타 시스템 연동이 빈번해지면서, 장애 전파를 방지하기 위한 Circuit Breaker 패턴의 중요성이 점점 커지고 있다. 특히 여러 인스턴스가 동시에 운영되는 환경에서는 분산 상태 공유가 가능한 구조가 필수다. 본 포스팅에서는 Redis 기반 분산 Circuit Breaker 구현을 중심으로, Kotlin + Coroutine 환경에서 안전하게 사용하는 방식을 소개한다.
Here is docker-compose.yml file and redis.conf
We need to create conf files for each node with same port but different cluster-announce-port and redis-cli -h localhost -p 26380 -a secret.
port 6379
cluster-enabled yes
cluster-config-file nodes.conf
cluster-node-timeout 3000
cluster-announce-ip [host IP]
cluster-announce-port 26379
cluster-announce-bus-port 17000
appendonly yes
requirepass secret
masterauth secret
version: "3.9"

services:
# for debugging to use ping nslookup and etc.
  debug-busybox:
    image: busybox
    command: sleep 3600
    networks:
      - sample-app
  redis-node-1:
    image: redis:7.2
    container_name: redis-node-1
    volumes:
      - ./redis-data/node1/redis.conf:/usr/local/etc/redis/redis.conf
    ports:
      - "26379:6379"
      - "17000:16379"
    command: [ "redis-server", "/usr/local/etc/redis/redis.conf" ]
    networks:
      - sample-app
    extra_hosts:
      - "host.docker.internal:host-gateway"

  redis-node-2:
    image: redis:7.2
    container_name: redis-node-2
    volumes:
      - ./redis-data/node2/redis.conf:/usr/local/etc/redis/redis.conf
    ports:
      - "26380:6379"
      - "17001:16379"
    command: [ "redis-server", "/usr/local/etc/redis/redis.conf" ]
    networks:
      - sample-app
    extra_hosts:
      - "host.docker.internal:host-gateway"

  redis-node-3:
    image: redis:7.2
    container_name: redis-node-3
    volumes:
      - ./redis-data/node3/redis.conf:/usr/local/etc/redis/redis.conf
    ports:
      - "26381:6379"
      - "17002:16379"
    command: [ "redis-server", "/usr/local/etc/redis/redis.conf" ]
    networks:
      - sample-app
    extra_hosts:
      - "host.docker.internal:host-gateway"

  redis-node-4:
    image: redis:7.2
    container_name: redis-node-4
    volumes:
      - ./redis-data/node4/redis.conf:/usr/local/etc/redis/redis.conf
    ports:
      - "26382:6379"
      - "17003:16379"
    command: [ "redis-server", "/usr/local/etc/redis/redis.conf" ]
    networks:
      - sample-app
    extra_hosts:
      - "host.docker.internal:host-gateway"

  redis-node-5:
    image: redis:7.2
    container_name: redis-node-5
    volumes:
      - ./redis-data/node5/redis.conf:/usr/local/etc/redis/redis.conf
    ports:
      - "26383:6379"
      - "17004:16379"
    command: [ "redis-server", "/usr/local/etc/redis/redis.conf" ]
    networks:
      - sample-app
    extra_hosts:
      - "host.docker.internal:host-gateway"

  redis-node-6:
    image: redis:7.2
    container_name: redis-node-6
    volumes:
      - ./redis-data/node6/redis.conf:/usr/local/etc/redis/redis.conf
    ports:
      - "26384:6379"
      - "17005:16379"
    command: [ "redis-server", "/usr/local/etc/redis/redis.conf" ]
    networks:
      - sample-app
    extra_hosts:
      - "host.docker.internal:host-gateway"

  redis-cluster-init:
    image: redis:7.2
    container_name: redis-cluster-init
    depends_on:
      - redis-node-1
      - redis-node-2
      - redis-node-3
      - redis-node-4
      - redis-node-5
      - redis-node-6
    entrypoint: [ "bash", "-c" ]
    command:
      - >
        sleep 5 &&
        echo yes | redis-cli -a secret --cluster create
        host.docker.internal:26379
        host.docker.internal:26380
        host.docker.internal:26381
        host.docker.internal:26382
        host.docker.internal:26383
        host.docker.internal:26384
        --cluster-replicas 1
    networks:
      - sample-app
    extra_hosts:
      - "host.docker.internal:host-gateway"

networks:
  sample-app:
    driver: bridge
Ok, it's time to run and moment of truth. Run following commands.
docker-compose -f docker-compose.yml up -d
If there is any error during containers are up and running, then you can run following command to connect one of redis node container.
redis-cli -h localhost -p 26380 -a secret
cluster nodes
if you run successfully the command on redis-cli, then you can see following results. If not, then please do debug using busybox. :)
a93fd053554bb8fdb6f1bfaf0a370a143dc3213a 172.20.0.8:6379@16379 slave a3e2edc5f519a7eea1a2bedd3d907ccabc89ae7a 0 1750408699000 3 connected
aaf139c2d79a9cb1d7eb087b57a0a8dcd9c1e671 172.20.0.4:6379@16379 master - 0 1750408699203 1 connected 0-5460
a3e2edc5f519a7eea1a2bedd3d907ccabc89ae7a 172.20.0.5:6379@16379 master - 0 1750408700000 3 connected 10923-16383
3a108159226cffb39a581f2dd5ee60d0c4ba47bf 172.20.0.7:6379@16379 slave 4297dec43cb75777abbf3d03b518da18419ebdef 0 1750408701272 2 connected
fce6a11b47b440945dea039c0c2b0ff29234a31e 172.20.0.3:6379@16379 slave aaf139c2d79a9cb1d7eb087b57a0a8dcd9c1e671 0 1750408700242 1 connected
4297dec43cb75777abbf3d03b518da18419ebdef 172.20.0.6:6379@16379 myself,master - 0 1750408701000 2 connected 5461-10922
Note How to install redis-cli
brew install redis
First we'd better check the logs from redis-cluster-init container. Check below command.
docker logs redis-cluster-init
If you see any wired thing in the log and something like below. then check directly status cluster nodes.
2025-06-20 17:38:07 Master[0] -> Slots 0 - 5460
2025-06-20 17:38:07 Master[1] -> Slots 5461 - 10922
2025-06-20 17:38:07 Master[2] -> Slots 10923 - 16383
2025-06-20 17:38:07 Adding replica 172.20.0.3:6379 to 172.20.0.4:6379
2025-06-20 17:38:07 Adding replica 172.20.0.7:6379 to 172.20.0.6:6379
2025-06-20 17:38:07 Adding replica 172.20.0.8:6379 to 172.20.0.5:6379
Next we'd better check a node can find another node(s), so we can check that using below commands.
docker exec redis-node-0 redis-cli -a secret cluster meet redis-node-1 6379
If you see like below error message, then it goes fail to resolve ip address.
ERR Invalid node address specified
웹 표준 결제를 위해 **이니시스(INIpay)**를 연동하던 중 다음과 같은 에러에 부딪혔습니다.
V901 : 잘못된 접근 방식입니다. 잠시 후 다시 시도해주세요
처음에는 signature나 timestamp 같은 보안 파라미터 문제인가 싶었지만, 실제 원인은 Referer 헤더 누락이었습니다.
공식 가이드에 따르면, V901 에러는 다음과 같은 경우 발생합니다:
"웹표준 결제창 요청시 Request header에 Referer값이 전달되지 않아 당사서버에서 Referer값 검증시 발생되는 오류입니다."
즉, 브라우저가 이니시스 서버로 결제 요청을 보낼 때 Referer 헤더가 없으면 오류가 발생합니다.
저는 로컬 개발 환경에서 Spring Boot + Kotlin + Spring Security + Freemarker를 사용��하고 있었고,
다음과 같은 조건으로 테스트를 진행했습니다:
localhost가 아닌 dev.mysite.local로 도메인 매핑 후 테스트Referer가 포함되어야 정상 작동함그런데도 계속 V901 에러가 발생했죠.
결국 원인은 Spring Security의 기본 ReferrerPolicy가 너무 보수적이었기 때문이었습니다.
별도로 설정하지 않으면 브라우저가 아예 Referer를 안 보내게 되어 있었던 것이죠.
아래와 같이 설정을 추가하자 문제는 바로 해결되었습니다 🎉
fun springSecurityFilterChain(http: ServerHttpSecurity): SecurityWebFilterChain {
    return http {
        headers {
            // ✅ Referrer 정책을 ORIGIN으로 설정 (도메인 정보만 전달)
            referrerPolicy {
                policy = ReferrerPolicyServerHttpHeadersWriter.ReferrerPolicy.ORIGIN
            }

            // (선택) frameOptions 비활성화
            frameOptions { disable() }
        }

        // ... 나머지 보안 설정
    }
}
form에는 반드시 name 속성을 지정해야 INIStdPay가 정상 동작합니다.
<form name="SendPayForm_id" id="SendPayForm_id" method="post"> ... </form>
timestamp, signature, mKey, verification 등의 파라미터도 반드시 이니시스 가이드에 맞게 생성되어야 합니다.
브라우저 F12 → Network 탭에서 Referer 헤더가 실제 포함되었는지 꼭 확인하세요.
이니시스 연동에서 V901은 참 해석하기 어려운 에러지만, 대부분은 Referer 관련 정책 문제에서 비롯됩니다.
Spring Security와 함께 사용하는 경우 ReferrerPolicy 설정을 꼭 �확인해보세요!
#이니시스 #INIpay #SpringSecurity #RefererPolicy #PG연동 #웹표준결제 #V901
테스트 팀 혹은 개별 인력에 대한 정량적 평가를 위해선 일단 기본 척도가 될 수 있는 품질에 대해 어떻게 측��정할 수 있을지를 먼저 정의하는 것이 맞을 것 같다.
brew install qemu
brew install socket_vmnet
brew tap homebrew/services
HOMEBREW=$(which brew) && sudo ${HOMEBREW} services start socket_vmnet
brew install minikube
minikube start --driver=qemu --network=socket_vmnet --alsologtostderr
Note Using
qemudriver with(or without)socket_vmnetcause an error from addingingress-controlleradd-on to minikube. But starting minikube withdockerdriver does not cause any issue with addingingressadd-on. Unfortunately I don’t know how to resolve the error yet. Error log...failed to register layer: lsetxattr security.capability...
start k8s on local with docker driver
minikube start --driver=docker --alsologtostderr
After building application docker image, please run below to put the image into mini-kube.
docker save sample-app | (eval $(minikube docker-env) && docker load)
apiVersion: apps/v1
kind: Deployment
metadata:
  name: sample-app
spec:
  selector:
    matchLabels:
      app: sample-app
  replicas: 2
  template:
    metadata:
      labels:
        app: sample-app
    spec:
      containers:
        - name: sample-app
          image: sample-app:latest
          imagePullPolicy: Never
          ports:
            - containerPort: 20080
              protocol: TCP
Please run below command.
kubectl apply -f [path of the file/sample-deployment.yml]
There has to be result messages including something like deployment.apps/sample-app created
kubectl get pods -w -n default
kubectl logs --selector app=sample-app -n default
apiVersion: v1
kind: Service
metadata:
  name: sample-app
spec:
  selector:
    app: sample-app
  ports:
    - name: webview
      appProtocol: http
      protocol: TCP
      port: 20080
      targetPort: 20080
    - name: weview-health
      protocol: TCP
      port: 20081
      targetPort: 20081
kubectl apply -f [path of the file/sample-service.yml]
minikube addons enable ingress
kubectl get pods -w -n ingress-nginx
apiVersion: networking.k8s.io/v1
kind: Ingress
metadata:
  name: sample-ingress
  annotations:
    kubernates.io/ingress.class: nginx
    nginx.ingress.kubernates.io/rewrite-target: /
spec:
  rules:
    - http:
        paths:
          - path: /sample/view/
            pathType: Prefix
            backend:
              service:
                name: sample-app
                port:
                  number: 20080
kubectl apply -f [path of the file/sample-ingress.yml]
We need to do port-forwarding or tunneling because mini-kube uses NAT and host-only network, which means it seems there is no way to connect from your host to ingress nginx on mini-kube.
kubectl port-forward [name of ingress controller pod] [host port]:80
minikube tunnel
Using httpie
http -vv ":80/[api or resource path]"
Using curl
curl -v localhost:80/[api or resource path]
Using httpie
http -vv ":[host port]/[api or resource path]"
Using curl
curl -v localhost:[host port]/[api or resource path]
If there is an error from starting mini-kube, then please stop the process and run below commands.
minikube delete --all --purge
docker system prune -a
eval $(minikube -p minikube docker-env)
kubec delete $(kubec get po -o=name)
we can use aliases for k8s commands, please copy below scripts to your .zshrc file
# k8s aliases
alias mkube="minikube"
alias kubec="kubectl"
alias mkubec="minikube kubectl"
If you are using M1(2 or 3), then please run below
sudo softwareupdate --install-rosetta --agree-to-license
Note
I know this is all about react-native dev setup but we’d better install flutter to setup each platform such as android and iOS using flutter. Because it helps us do that in easy. So please install flutter first
Install
brew install --cask flutter
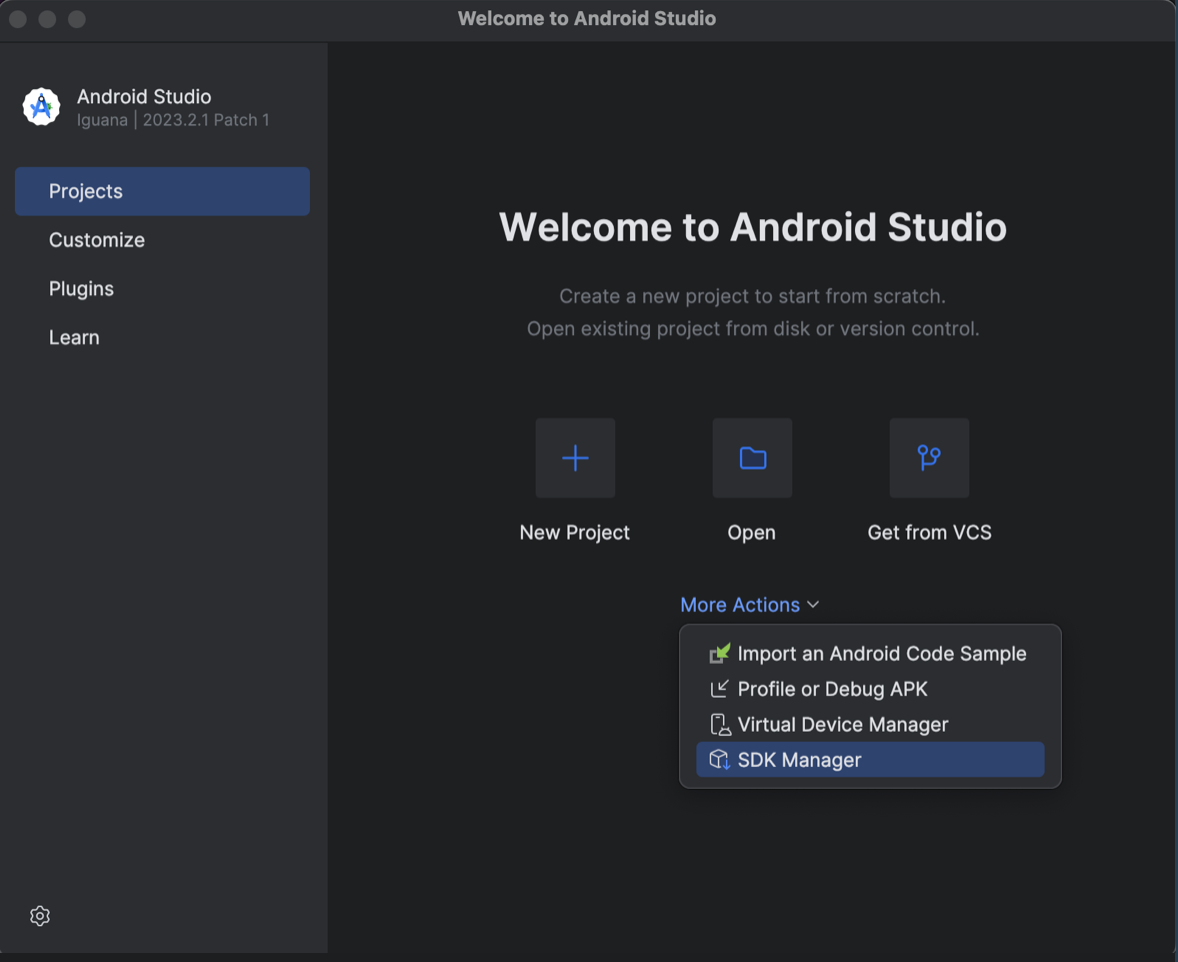
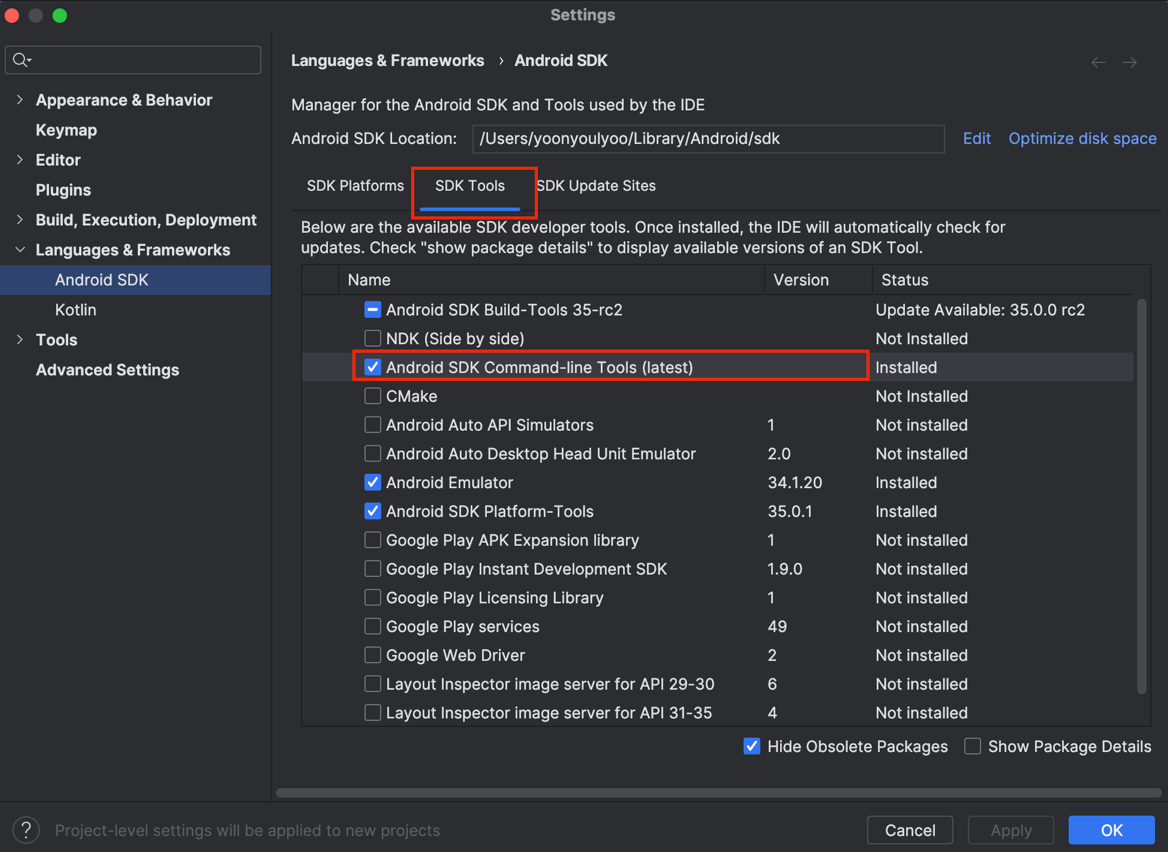
Install Android SDK Command-line Tools (latest)
agree on android-license
flutter doctor --android-licenses
set ANDROID_HOME to path
# android
export ANDROID_HOME=~/Library/Android/sdk
export PATH="$PATH:$ANDROID_HOME/tools:$ANDROID_HOME/tools/bin:$ANDROID_HOME/platform-tools"
Install
sudo gem install drb -v 2.0.6
sudo gem install activesupport -v 6.1.7.7
gem install cocoapods --user-install
gem which cocoapods

# check the result
~/.gem/ruby/2.6.0/gems/cocoapods-1.15.2/lib/cocoapods.rb
sudo xcode-select --switch /Applications/Xcode.app/Contents/Developer
sudo xcodebuild -runFirstLaunch
Note
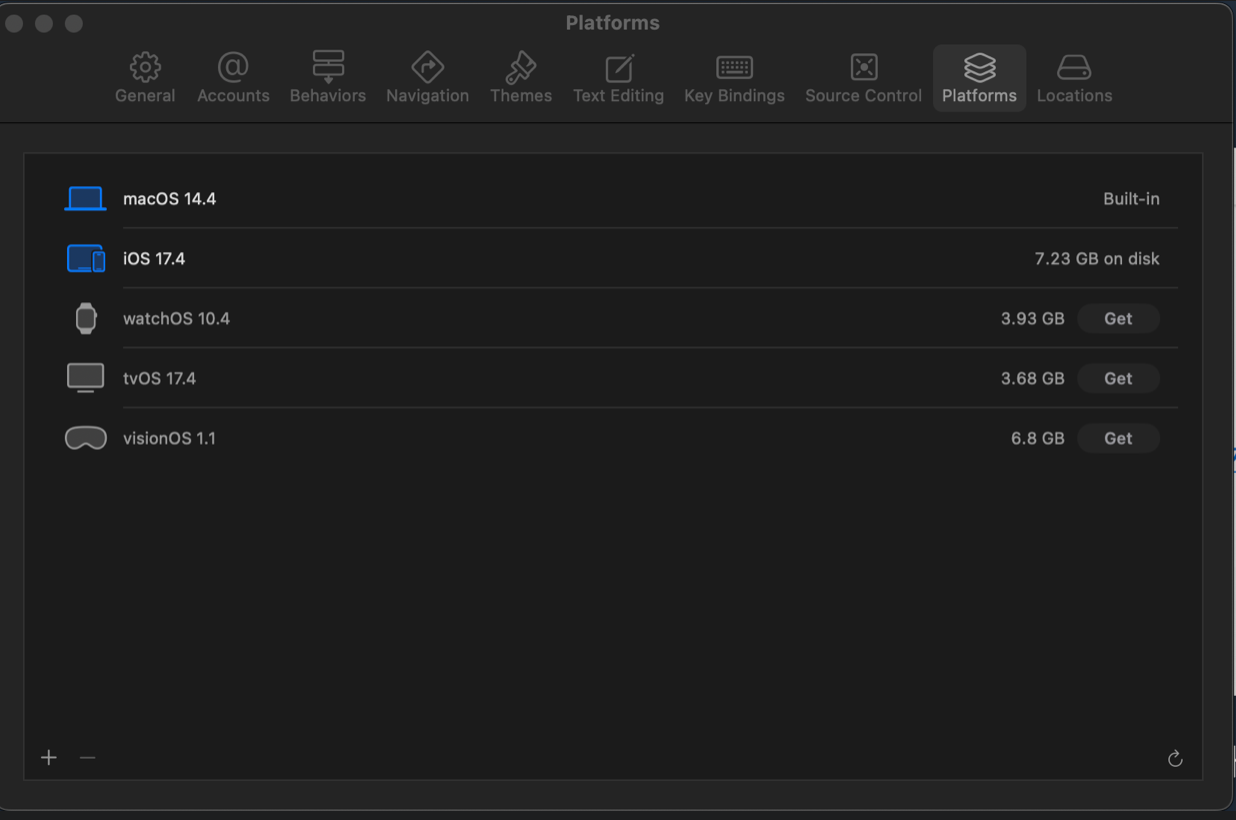
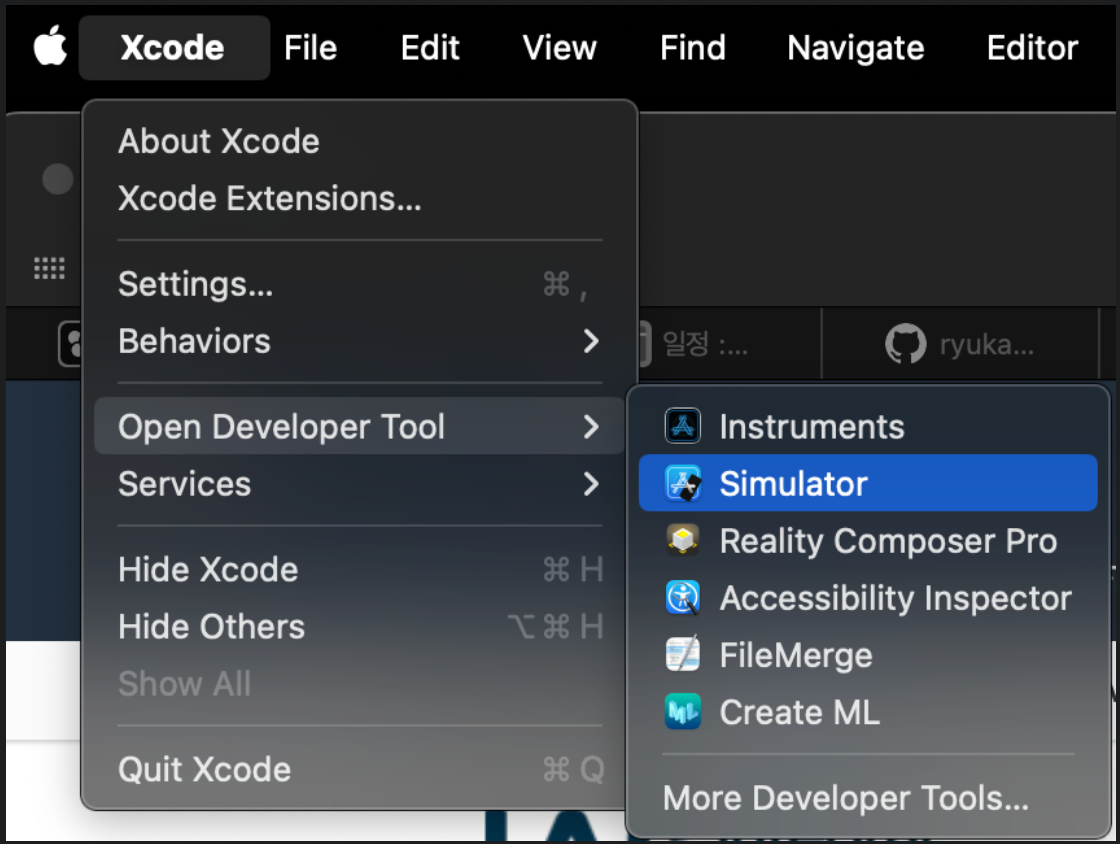
How to get iOS for a simulator
- Open Xcode
- Go to Xcode and select Settings
- Move to Platoforms tab
- Get a version for each platform
brew install watchman